Main Menu - Misc. - Clothing/Textiles - Medieval Wales - Names - Other Medieval - Publications - Harpy Publications
This article focusses on a particular stitch technique from medieval Egypt. (I’ve previously done a class that was a more extensive survey of this technique.) The material bears noticable resemblences (and is probably an ancestor of) certain types of blackwork found later in Europe. In Renaissance-era work, the technique is sometimes called "Holbein stitch", and that term can be used here for convenience even though it is highly anachronistic for this material. The particular material under consideration here is done in a counted-thread technique (working over 2-4 threads, but primarily over 2) using a double-running stitch (or a technique with an identical effect) with largely geometric or highly stylized plant and animal motifs built up from horizontal and vertical segments (extremely rarely, diagonal stitches or cross stitches are used). Although multiple colors may occur in the same piece, individual sections of the motif are worked in a single color, rather than combining colors to form patterns. Without seeing the backs of the work, it is hard to know to what extent the technique was designed to be reversible. In some cases, it could have been, but in others (e.g., with detached motifs) it could not have been completely reversible. Some examples form words and were clearly intended to have a "right" side.
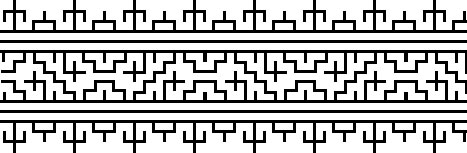
The material here all dates to the 13-14th centuries (it may also be described as from the Mamluk period) and is worked in colored silk thread on a natural linen ground. The dominant colors are black (or colors that are probably faded black, such as a brown-black), dark and light blue, and red. The resolution of the photography is rarely good enough to see fine details, but in at least one case it is good enough to tell that the silk thread is at least two-ply and has at least some twist. The ground fabrics vary considerably in fineness, from ones described as extremely fine to moderately coarse ones. Although dimensions are given for all the pieces, the photographs are often only of a small segment of the piece, so it isn't always possible to tell the true scale of the pattern. When it is possible, thread-counts appear to run around 10-25 threads/cm, which translates to stitch-sizes of 5-10 per cm. We’ll be working at a somewhat larger scale in this class.
Because many of the surviving pieces are mere fragments, it can also be difficult to identify what sort of object they come from. One piece is clearly a garment -- although a doll's garment. The narrow width of a couple of pieces suggests the possibility that they may be ornamental turban ends (this is suggested by pictorial evidence showing ornamental bands of similar type on the loose ends of turban fabric). The commentary accompanying several of the pieces suggests that they are ornamental bands on tunics (hem and sleeve bands, neck bands, vertical stripes, etc.) and contemporary pieces in other stitch techniques occur on pieces that are clearly of this type.
There are some identifiable sub-styles in this general technique. Two sub-styles that won’t yet be considered here include one that builds up geometric patterns or even Kufic script from little boxes (in German "Kästchenstich") and another that uses Holbein stitch and pattern darning fills in contrast with drawn-thread work (either contrasting as a pattern-and-ground or simply in alternating regions). These may be added at a later date.
The motifs demonstrated here generally focus on bands of pattern, even when a larger region is being filled. Bands may contain cartouches of various shapes (which in turn may contain Kufic script), or negative-space "S" patterns, key-type patterns, or other types of small scale tiling patterns. Passant lions are the only animal motif in the available material, and highly stylized birds can also be found, often in combination with stylized trees or bushes. These may occur within a band or "standing" on top of a horizontal band. Geometric designs are somewhat more common, however, including octagons, stars built up from lozenges, diamonds, and triangles. A few pieces have a larger area of embroidery at one end of a long, narrow strip of fabric. (The sources don't usually discuss the function of the embroidered items, but I would speculate that these may represent decorative ends of a strip used to form a turban.)
The following books are good sources of examples of this type of work.
A good accessible (and in-print) introduction to medieval Egyptian embroidery. It covers a variety of technique, not only the one described in this article.
A catalog of medieval and older Egyptian textiles. Black and white photographs, although mostly on a rather small scale. The text is in French.
A catalog of medieval Egyptian textiles at a museum in Berlin. (I haven't verified whether the material in this collection survived WWII.) In German. Kühnel is also co-author of a larger catalog that includes much of this material, as well as items from the Coptic period, which is in English, although the translation often falters badly on textile terminology. Photographs are primarily black-and-white with a very few color plates.
A brief article on several pieces in a Swedish collection. The photography is rather poor, unfortunately.
An exhibition catalog in French, including a wide variety of textile material. Only a few pieces belong to the technique described in this article. The pictures and descriptions are generally excellent and most of the pictures are in color.
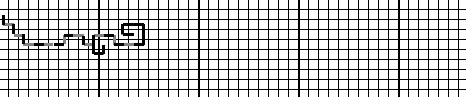
So you have a chart for a pattern like the one below (fig. 1) -- how do you figure out how to stitch it?
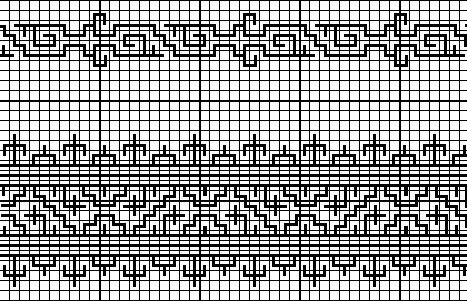 figure 1 (Tissus #189)
The stitch used for this embroidery is a double running stitch -- that is, you make a dashed line with a running stitch and then turn around and fill in the spaces coming back. (Fig. 2)
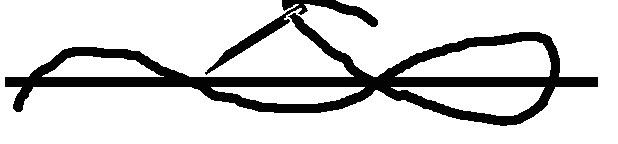 figure 2 (double running stitch)
The simplest design you can do is a plain straight line (fig. 3). The next simplest is a line that meanders around but doesn’t do any branching (fig. 4).
figures 3 & 4
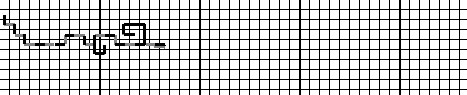
At any point in the process, you can branch off and do a “return trip” back to the branching point. This works because a trip “out and back” results in a solid line with the needle and thread ending up back in the same position as before you started the branch. So, for example, a complicated-looking pattern like figure 5 (Tissus #189 a) is actually fairly straightforward to sew because it’s just a matter of branching lines.

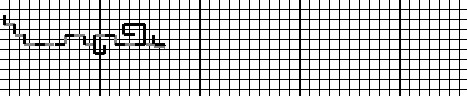
There are two features of a pattern that can complicate working out how to sew it. The simpler one is closed loops. Figure 6 shows a part of a band pattern from Tissues #189b.
![]() figure 6
figure 6
When you sew it, you need to “break” each loop at some point so that you’re visualizing the pattern as a set of branching lines that just happen to touch in some places. So, for example, imagine you’re working from left to right: take the straight line at the bottom as your “baseline”; work each branch as you come to it up to the point where it comes back to the baseline, and break it there (i.e. turn around at that point and do your “return trip”). (Fig. 7)
![]() figure 7
figure 7
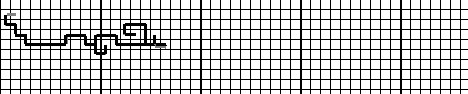
Looking at the whole band from Tissues #189 (fig. 8), you can break it down into a series of independent strips: the above line, a simple straight line, a complex central band, and then the first two again in reverse order. The outer pairs are easily dealt with as above. The central band, in turn, consists of two outer straight lines, each with some branches and loops coming off of it that can be dealt with as above, and also with some diagonal lines that connect the two outer lines.
figure 8
The easiest way to approach the central band is to treat it as two independent patterns, and assign the connecting diagonals to the first one that you work. So the analasys of how to work the pattern, with the “breaks” shown, can be seen in figure 9.
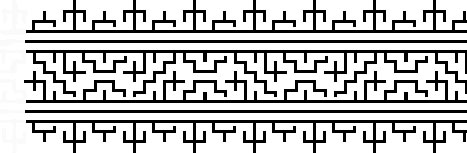 figure 9
The second type of complicating factor is independent design elements -- that is, parts of the pattern that don’t touch any other part of the pattern. If you have a design where all parts of the design are connected, then not only is the working layout relatively straightforward, but you can sew it so that the pattern is completely reversible. (Note that we don’t know how reversible the originals are even when they can be -- mostly we’re only shown the “right side” in pictures. )
In the previous band, we had a number of independent elements worked in parallel. This can be done by working each element completely (which brings the work back to the lefthand edge), then carrying the thread down to the next starting point and simply assuming that the edge of the band will be concealed in some way when it’s used.
The narrower band, Tissues #189a, presents a slightly more complicated case. Figure 10 shows the design with the alternating independent elements in black and gray.
 figure 10
Not only do you have to deal with carrying the thread from one element to the next, but you have to figure out how to plan the work, because if you work one element starting at the left and complete it (ending up back at the left end) you aren’t in position to start the next element. There are several ways to get around this. You can simply work each element separately, knot your thread at the end of it and start fresh on the next element. In this particular case, notice that alternate pairs of elements (e.g. all the gray ones or all the black ones) almost touch at the ends, and you could almost treat them as two continuous lines: work one all the way across and back, then work the other all the way across and back. (You’d only have to carry the threads across the back of the work at the break between elements.) A more complicated way might be to treat one set (e.g. the black lines) as the “main” pattern and the other set as a pair of “branches”. Work one direction of the first black pattern; carry the thread under to a starting point in the middle of the next gray pattern; work one half of the gray pattern out and back, then the other half out and back; carry the thread under to start the next black pattern and work it in one direction only; then when you’ve worked all the way to the righthand end of your band, do the “return trip” on the black pattern elements all the way back to the lefthand edge. Figure 13 following shows one approach to working this design, with black lines showing the visible thread and gray lines showing the thread-path on the wrong side of the fabric.
Step 1: follow the pattern with a running stitch until you get to the first branch

Step 2a: from the branch-point, follow the short "leg" out to the end
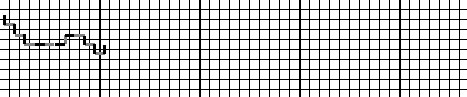
Step 2b: retrace this "leg" back to the branch-point; notice that the thread is emerging from the branch-point exactly as it did before you worked the "leg"
Step 3: work your single running stitch up to the next branch-point
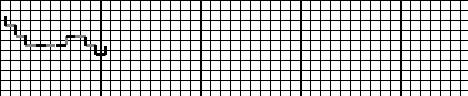
Step 4a: again, follow the shorter leg of the branch to the end ...
Step 4b: ... and return to the branch-point
Step 5a: at the end of this part of the pattern you have two equal legs; work one ...
Step 5b: ... and then the other
Step 6: return along the path of your main line, filling in the other half of the "double" running stitch
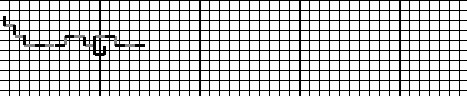
Step 7: pass the thread on the wrong side of the fabric to the starting point of your next motif and begin working it as above
Step 8: work until you get to the end of the motif ...
Step 9: ... and then return to your starting point; due to the layout of this design, you'll have to knot your thread and restart it
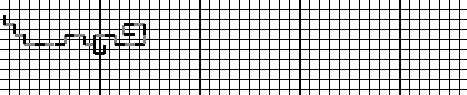
Step 10: the upper dot shows your next starting point
Another way to deal with this design would be to do a first pass working only every other motif. Work up through step 5b above (but working the vertical branch at the end before the horizontal one), at which point you'll have plunged the needle down through the lower dot. Pass the thread behind the work and up through the upper dot. Now work the first pass through that motif. Continue this way, working the first pass through every other motif until you get to the end of the row, then work back doing your second pass until you're back to your starting point. Looking back at figure 10, you'll have done the equivalent of working all the black motifs, but not the gray ones. Now procede from step 7 above, but again do only the "first pass" for each motif, until you've work all the way to the right, then return on the second pass to complete the motifs.
A simpler, if less elegant, method can be used for smaller independent elements. Figure 11 shows one element from a more complex design. The small crosses are separated, but the rest of the design is continuous.
 figure 11 (Kühnel
3174)
figure 11 (Kühnel
3174)
When you get to the nearest point to the separate element, carry the thread under the back and then do the complete separate element. If you came back to the starting point, you’d have the thread on the right side of the fabric, so instead, the last time you put the needle to the back of the fabric to complete the cross, carry it back to the main pattern line, but remember to leave a one-stitch space between where you branched off and where you continue the pattern again. Figure 12 shows suggested “breaks” in the pattern, and indicates one possible way to carry the thread over to do the cross in gray.
 figure 12
The following pieces are my own charts. Ellis includes charts of a number of other examples of this technique. Kühnel has a number of other examples where the pattern can be worked out with some effort. The photography in the Lamm article, however, makes the patterns of those pieces more difficult to decipher. Other items may be added as I work out the patterns. Each line on the grid represents a pair of threads in the ground fabric.
(The desgn repeats regularly. The chart above has a small flaw in that it shows the "S" design in the partial cartouche at the right as a mirror image of the one shown in full on the left. Instead, it should be identical the the left-hand one. The empty space at the left holds the next octogon, which I haven't shown.)
The full design looks something like this. See below for a close-up detail with grid-lines.
Detail
My translation of the original catalog entry is:
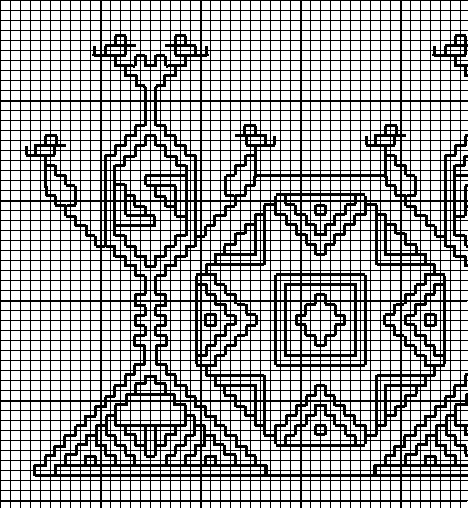
Front part of a garment. Plate 30. Height 93 cm, width 56 cm. Sleeve fragment thereto. Very damaged; the weave is strongly browned, with stains, the decoration partly faded and in various places missing. Medium strong weave with predominantly red, but also in places black silk embroidery. In the middle, a large hexagon with checker-board pattern, the interior alternately empty and with horizontal cross. A broad border, symmetric on both sides, with elongated hexagonal shields in red, in the middle of which, similar diamonds with eight-pointed stars stand between black geometric fill-work. Attached on both sides large triangular wedges with a border of crosses and hooks and ten facing lions or dogs, again red, with a black, mangled, mostly lost inscription. A single 'dog' farther, part red, part black, in the open space. Traces of further decoration in black next to the large central hexagon. Egypt, 13-14th c.
I haven't smoothed out the German syntax yet.
These are selected motifs from this piece. The triangle with the leopards inside (motif A) sits on top of a wide horizontal band composed of two narrow bands (one of which is shown in A) around a wider band that isn't included here yet. The fabric with this motif appears to have been joined with another piece of fabric (which itself seems to be slightly pieced) with a different set of motifs, primarily a regular "checkerboard" (C) that fills a triangular area (or possibly a truncated triangle)
Motif A
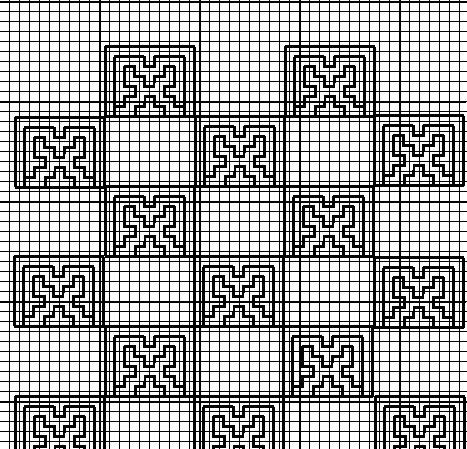
Motif C (this fills a triangular area whose edges are formed by a "step" pattern worked up-one, across-one)
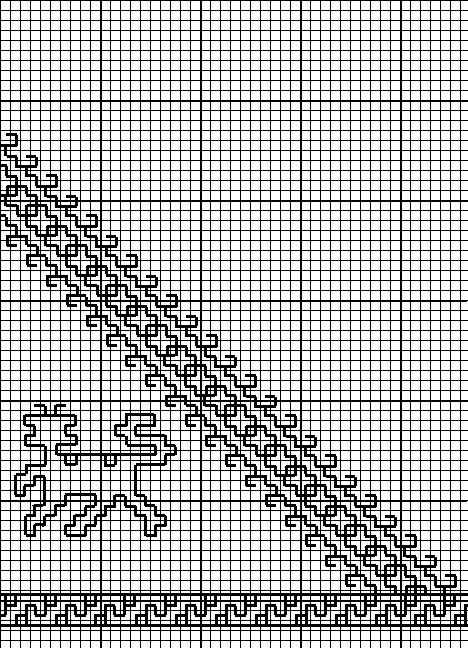
My translation of the original catalog entry:
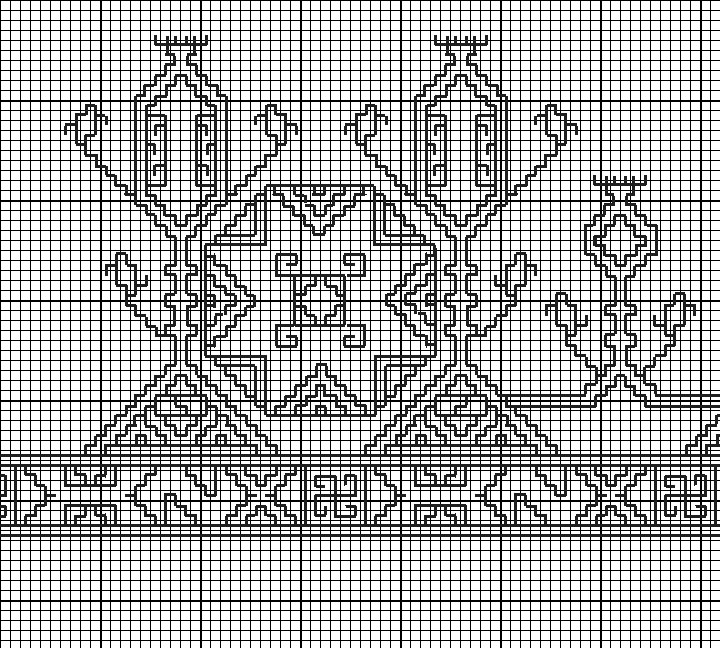
Fabric fragment from a garment. Plate 30. Height 35 cm, width 80 cm. (Sewn together from various framents.) Yellowed and strongly stained, the decoration faded. Considerably damaged linen with olive-black silk embroidery. Cross-stripes completed on both sides from small squares, in which alternate crosses and tiny roaring 'lions', as frame for a "path" from crosses in rectangles and squares with small birds next to hook filled diagonal bars. Running from there to both edges in equal distance three ornamental ??"Schrüre"??; the middle one of diamonds and enlongated shields, the others of crosses and shields with geometric filling-rows. On the one side, as termination parallel with the middle band an intersecting border of opposed birds in triangular composition with various filling-work and interior hooked bands. Egypt 13-14th c.
This is another complex, multi-element design which may include multiple independent pieces of fabric sewn together. At the upper edge is a horizontal band with pairs of birds (not yet charted). There's a seam between this region and the lower part of the fabric, and some of the lower motifs end abruptly at the seam, suggesting that the two regions have been pieced together. The main horizontal band in the lower section is composed of a long rectangle with the following motif worked around the edge. (The lions are right side up on the upper edge and upside down on the lower edge. The ends are a bit hard to make out. There are also some finishing bits extending from the ends.)

In the interior of the box formed by the above band is another band that I haven't charted yet. Three narrow band extend vertically above and below this horizontal band, forming a string of joined diamond and cartouche motifs (not yet charted).
My translation of the original catalog entry:
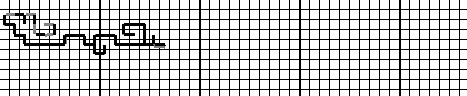
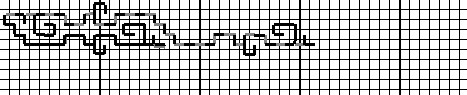
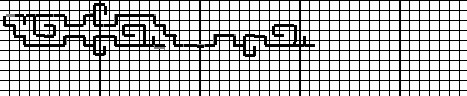
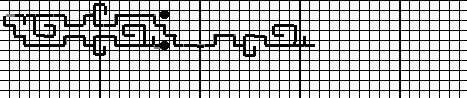
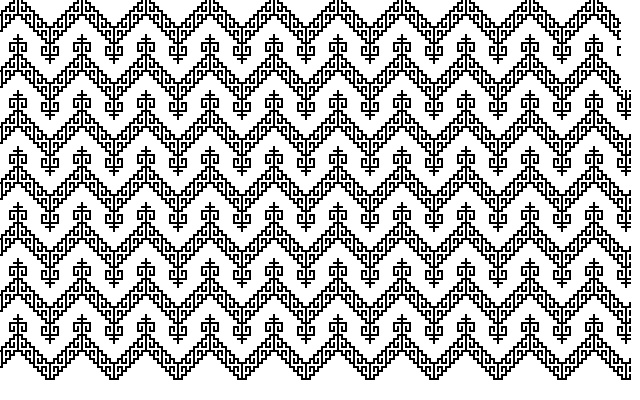
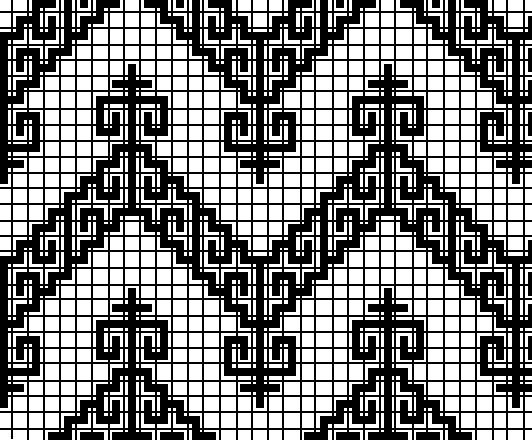
Fabric fragment. Place 31. Height 20 cm, width 56 cm. Badly browned and with damaged places. Firm linen of medium weight with dark blue silk embroidery; right selvedge. Through-going ornamental band of octagons with large stars and small inner crosses between tree-like figures; as a transition, smaller stylized bushes. As a termination on the right a pair of pacing dogs (?) [sic] at the sides of a tree which is repeated at the edge yet again (compare 3173a). An attached, lower border, with shields filled with swastika-motifs alternated with horizontal S-motifs. 3.5 cm away, a small "astragal" band. Egypt, 13-14th c.
The motif repeats the set of elements as shown, i.e., the beginning of a triangular base seen in the lower right is the next repeat of the first triangular base seen at the lower left.
(I haven't included my translation of the original French catalog notes.)
These motifs appear on a doll's tunic which has been pieced together from some other item. They appear in various places, including the lower hem and around the sleeves. (There is also an appliqued embroidery of some sort of animal in a different type of stitch.)
This site belongs to Heather Rose Jones. Contact me regarding anything beyond personal, individual use of this material.
Unless otherwise noted, all contents are copyright by Heather Rose Jones, all rights reserved.